https://www.facebook.com/pages/TasteofMysore/128939487156170?ref=hl

Kempu Rotti aka Red Rotti

Akki Rotti is my favorite. I think all those visitors who come here might have understood it by now. I (We) have various versions of akki rotti. This rotti was introduced to me by my mother-in-law. It tastes different err....something like nippattu.. I became a instant fan of this rotti and I am sure you will love it too..if you are a akki rotti fan. Here is my MIL's recipe for you all.....

Ingredients :
Akki Hittu (Rice Flour): 2 paavu (1 Paavu=approx 250g)
Hurk(g)adale (roasted split chickpeas without outer coat) : 1.5 hidi (hidi = fistful)
Grated fresh coconut : 5 tbsp
Red Chillies : 15 (you can use more to make it more hot)
Cumin : 1tsp

Onions : 2-4 (de-skinned and chopped into thin pieces)
Salt

Oil : as required

Gadgets : Akki rotti pan or a non stick tava; Non-sticky paper if you are using non-stick tava.

Method :
1.Grind to smooth paste Hurgadale(pottukadalai), grated fresh coconut, redchillies, salt and cumin using little water. Add this paste to Rice Flour. Reserve the water you have used to wash the grinder jar. Warm it.
2.Mix rice flour, paste and chopped onions with warm water to make a soft but stiff dough.
3.Grease akki rotti pan and take a big lemon sized rice flour dough and start patting it to make a circle.
4.Place the rotti pan on tava and cover the pan. You can see the pictures here. Keep turning the tava every 2 mins so that the whole rotti is evenly baked.
5.Reverse the rotti and roast it on the other side too. Remove and serve hot with tuppa/ghee.

If you are using non-stick tava :
Use a non-stick/one side laminated paper. Grease the paper with little oil.
Take a a big lemon sized rice flour and make a ball. Press down the ball and pat it to make a circle. You can grease your fingers with little oil if it sticks.
Transfer the paper with rotti to the hot tava with rotti side facing the tava.
Let the rotti with paper stand for 2 mins. Now slowly peel the paper from the top and make another rotti using the paper.

Photobucket

Hitikida Avarekalu - Sihi mathu Khara (Curried Hyacinth Beans/Surti Papdi)

This is the last post of the year. Taste of Mysore wishes all it's readers a very happy and funfilled new year. Let's say bye to 2008 and welcome 2009, let this journey for a new year begin with a smile :)

An avarekaalu smiley for welcoming 2009 :
Photobucket

Avarekalu/Hyacinth beans/SurtiPapdi season is on! in Karnataka and it's raining Avarekaalu at home. From upma to sambar you can find it in all 3 meals. A crunchy snack also is made for tea time..so it is totally avarekalumaya (avarekalu everywhere). Khara (curried) Hitikida Avarekalu (de-skinned beans) is very popular and every household has it's own way of making it. Here is my mother-in-law's way of making
Hitikida Avarekalu.
Photobucket

How to deskin:
Soak fresh (peeled) beans in water for 2-3 hours. Remove water from the beans and hold the bean between two fingers and de-skin it. The action is that of snapping your finger with a bean between your fingers.

Curried Deskinned Hyacinth Beans : (for 5-6 people)
You need the following :
Deskinned Beans : 200gms

To make curry paste/masala
Red Chillies : 10
Coriander seeds : 1.5 tbsp
Cumin : 2 tsp
Balck Pepper : 8
Fenugreek Seeds : 1/4 tsp
Mustard : 1/2 tsp
Garlic : 1/2 pod
Toasted Onions : 1/2
Grated Fresh Coconut : from 1/2 coconut (small coconut)
Tamarind : 1tbsp
Salt
Jaggery (optional)as per taste.

Other ingredients :
Oil : 2tsp
Onion : 1 chopped into 1" cubes
Curry leaves, turmeric powder

Method :
1.Cook deskinned beans in sufficiant water till it is soft. Beans should not be mushy.
2.Heat oil in a pan and add mustard seeds. Once it stops crackling add curry leaves, turmeric and onions. 3.Sautee till onions are soft.
4.Grind all the ingredients listed under curry paste with little water to make a smooth paste.
5.Add cooked beans, masala paste and salt. Bring it to boil. You can add jaggery if you wish. Boil the curry for next 10 mins till the beans get cooked in masala paste. Check for the correctness of salt and switch off the stove.
6.This curry is best served with dosa, akki rotti, chapathi. We love it/devour it with dosa.

Sweet Deskinned Beans/Ellu Avarekalu
You need the following :

de-skinned Beans : 2 cups (1 cup =100ml water)
Jaggery: 1.5 cups
White sesame seeds : 2 tbsp
Cardamom pod : 1
Grated Coconut: 1 cup
Ghee : 3 tbsp
Cashews and Raisins
Method:
1.Cook deskinned beans in sufficiant water till it is soft and not mushy. Beans should still hold the shape
2.Fry sesame seeds till they are fragrant and let it cool. Powder it in a mixer grinder along with a pod of cardamom.
3.Heat jaggery with 3 tbsp of water. Let jagerry water boil for about 4 mins. At this stage the syrup is thick. 4.Add cooked beans, powdered sesame seeds, grated dry coconut and 1 tbsp ghee. Mix well and bring it to boil. Let it boil for a min. Do not over boil it as beans will harden. Remove from stove and set aside.
Serve hot/cold.

Gasagase Payasa (White Poppy Seeds in sweet coconut sauce)

A post from Mysore.......
I had to put the above statement as many doubt about the availability of Poppy seeds in Singapore. This delicious payasa is everyone's favorite at home. It gives kind of 'drunk' effect after it's consumption and you all know the reason. If you are not sure of poppy seeds check it out here. It is a very simple and delicious payasa which is made on many festive occasions.


Gasagase Payasa :

Gasagase/Poppy Seeds : 1.5 fistfulls (Soak it for 2 hrs in luke warm water)
Grated Coconut : from 1 small coconut
Jaggery : 3/4 of the amount of grated coconut

Photobucket

Measure grated coconut. If coconut measures 3 cups take 2 cups of jaggery.
Grind coconut, jaggery and soaked poppy seeds in a blended to make a smooth paste. Use very less water to grind if required.
Remove the contents to a non stick pan and bring the contents to boil. You may dilute payasam with milk or with water.
Serve hot or chilled, both are lip smackingly delicious!

Hema of Adlak's Tiny Kitchen has showered me with Best Blogger Friends award. Thank you soo much Hema.


Nimbe Saaru ~ Clear Soup

'No Milk' 'No Yogurt' 'No coconut' there were many on 'No' list. Nope..I am not talking about Veda's Challenge event..I am recovering from food infection :( . Doctor gave me a list of 'No' eating foods and said "please do yourself a favor" don't eat these foods for next few days till your intestine recovers :( Stay on clear soups! CLEAR SOUPS! for how many days ....? there came a calm answer 'as many days as your intestine takes to recover' :) gosh!!! was my response to myself :( My troubled stomach groaned for food..no coffee too....I ran my hand over my stomach and said to it :P Well, I was pondering how to gulp in CLEAR SOUP.


Nimbe Saaru (patient's friend) came to my rescue! I just indulged myself drinking it added little well mashed rice to it and it was perfect. This is a 'nothing exotic' recipe but I thought of blogging to it for my future reference.

Nimbe Saaru

You need the following :

Toordal : 1tbsp
Water : 500 ml
Turmeric : 1/2 tsp
Curry Leaves : 4 leaves
Coriander Leaves : 1 tsp (chopped)
Lemon Juice from 1 lemon
Salt

Photobucket
Oggarane/ Tadka
1 tsp oil, Cumin - 10-12 grains, red chillies broken - 1 small piece,

Method :

1.Pressure cook Toordal in 500 ml water with turmeric and curry leaves.
2.When the pressure is down, remove the vessel and separate the water from dal. Mash dal well with the help of a spoon. Mix dal and water.
3.Heat a tsp of oil in a pan. Add cumin, sautee and add red chilli piece mix well to coat the oil over chilli. Add dal and water mix.
4.Add salt and bring the mixture to boil. Taste the soup for salt. Switch off and add lemon juice and chopped coriander juice. Mix and let the saaru/soup sit for next 10 mins before you scoop into a bowl and gulp it down.
5. You can mash rice well and add this soup and enjoy it!!

I simply loved both the pics so have put them in.....

Photobucket


Here is my precious kitchen treasure...My Akki Rotti Pan ;) for Kitchen treasures event hosted by Dibs and Chitra at Chitra Ammas Kitchen.

This is a cast iron pan which is specifically made for Akki Rotti. We call it banale (pan) rotti or thalipet (in Chitradurga Davangere sides..) . These pans are very thin. The picture shown below is the thickest akki rotti pan I have come accross but, I had no choice but buying it as I had no time to hunt for the thinnest one. We come from a family of traders/merchants. Oil tins were in abundance at grandmothers place. Empty oil tins were given to a shop (don't remember this specific clan name now) where they artistically made round rotti pans. They were again washed cleaned and given a bath with several changes of rice water then oiled and made rottis. Now..all these efforts were certainly fruitfull when one eats thin, crisp, rotti aaahhhaa..is all I can say in appreciation to my granny made akki rotti.

Photobucket

How thick is my rotti pan? see it here...
Photobucket

They go to Dibs for their Kitchen treasure hunt event..

Paav Bhaji

We had few guests and I decided to make Paav Bhaji. It turned out very good. The recipe was from Tarla Dalal and Nupur of One Hot Stove. I refered to both pages and took good tips from both pages and went on preparing Pav Bhaji. I made Pav Bhaji Masala at home which worked out very well.

Pav Bhaji Masala Powder :

Ingredients :

Anistar Powder - 2 tsp (anistar roasted and powdered)
Black Cardamom - 1
Black Pepper - 10
Cassia Leaf/Tej Patta - 1 leaf
Red Chilli - 6
Cloves - 4
Balck Salt/Sanchal - 2tsp
Coriander - 2 tbsp
Cumin-1tbsp
Dry Ginger - 2tsp
Dry Mango - 2tsp
Fennel- 2tsp
Turmeric- 2tsp

Dry roasted all ingredients except turmeric and powdered it in a mixer grinder. I used 2 tbsp of the above powder in making Pav Bhaji.

Pav Bhaji :
Green Bellpepper : 1
Carrot : 1/2
Cauliflower :  2cups of florets
Potatoes : 3 big
Peas : 1 cup
Tomatoes : 3 big
RedChillies : 4 (soaked in hot water)
Garlic : 4 pods
Butter : 1tbsp
Oil : 1tbsp
Pav Bhaji Masala : 1 to 2 tbsp
salt


Preparation :
1.Pressure cook washed, peeled, and chopped potato, carrot, peas and cauliflower to 3 whistles. Separate cooked veggies from water and reserve the stock water.
2.Grind soaked redchillies with garlic to smooth paste.
3. Chop bell pepper into small pieces
4. Grind Tomatoes to smooth paste

Photobucket

Method :
1.Heat oil in a kadhai/pan. When oil is hot add  about 1 tbsp of garlic and redchilli paste. Sautee for few seconds. 
2. Add 1/2 tbsp of pav bhaji masala, sautee and add tomato puree. Bring to boil. When tomato paste becomes thick like sauce add cooked vegetables. Using a potato masher mash vegetables. Mix veggies with tomato puree..add stock water as and when required. Add Pav Bhaji Masala, salt and bring the mixture to boil.
3. Taste the bhaji and adjust salt and pav bhaji masala till you get a taste required. Add a blob of butter on top and simmer it for 15-20 mins with intermittent mixing..

Assembling
Chopped Onions, Chopped Coriander Leaves, Wedges of Lemon, Pav Buns, Bhaji
The left over chilli garlic paste is generously spread on pav bun. Toasted it on hot tava using as much butter you want.
Serve Hot with Bhaji and Chopped Onions, coriander leaves and lemon wedges.

Enjoiii...


Pudina Pulav/Mint flavored Rice

You can see many types of Pulav these days in all blogs, as Rice Mela hosted Srivalli is in air! I wanted to post this before the date line however the last week of November was really disturbing and could not post anything. I hope Srivalli will accept this for her Rice Mela.

Pudina Pulav

You need the following :
Pudina/Mint Leaves - one small bunch
Coriander Leaves - 4 lines
Cloves - 2
Cinnamon - 1" piece
Marathi Moggu - 4 (click on it to see the pic)
Green Chillies - 5 for 1 paavu (approx 1/4 Kg)

Grated Coconut - 1.5 cup (1cup holds100ml water)
OR
Thick Coconut Milk : 50 ml
Ginger - 1" piece
Garlic - 3 big pods or 6 small pods (small means Indian variety)

Rice - 1 Paavu (approx -1/4 Kilo) (if using basmati, wash and soak for 15 min)
Oil/Butter - 3 tbsp (preferably sunflower/gingely oil)
Curry Leaves - from one line and Mustard 1 tsp
Salt

Vegetables :
Carrot, French Beans, Peas, Potato, Onion cut into desired shape

Photobucket
Method :
1. In a pan roast/fry cloves, cinnamon, marathi moggu and green chillies with half a teaspoon of oil.
2. Grind roasted cloves, cinnamon, marathi moggu and green chillies with coriander, Mint, grated coconut ginger and garlic to a smooth paste.
3. Heat cooker pan and add oil. Add a tsp of mustard and when it stops spluttering add curry leaves.
4. Add all cut vegetables and sautee for 3 mins.
5. Add ground masala and sautee till the raw smell in masala goes away.
6. Add salt, and water (1 cup rice: 2cups water) and bring it to boil. Taste the water and check for correctness of salt.
7. Wash and drain rice. Add rice to boiling water and give a good stirr.
8.Close the cooker lid, place the weight. Cook it for 3-4 whistles. Switch off the cooker and let the pressure come down
9. Open the lid and mix the rice and serve hot with cool cool onion tomato raita.


This goes to Sri's Rice Mela

Congress ~ Spicy Peanuts

This is one snack which is welcomed anytime of the day with tea or coffee back at home. As you start eating them, they slowly take your following sense organs and rule them : tongue, nose, ears and eyes. They make them feel their presence. Eyes feel happy and tear, nose says I love you and sniffs, ears get hot while your tongue is busily engaged in coordinating the responses with brain and makes you ask for more! Isn't it wonderful ;-)


People of Bengaluru love them (esp if they love peanuts). Peanuts has fans from all classes of people in India because it is pocket friendly :D. I remember my dad's friends fondly referring it as 'badavana badami = poorman's cashewnut'.


Congress Kadalebeeja - why did they name it so? I was looking for an answer and got it here . Although I have munched it umpteen times for years, I never went upon questioning anyone for it's politicised name. Politics is not my topic of interest :D It is a simple snack which can be made in about 20 mins time if you have a microwave oven, or else it may probably take 15 mins more if you don't have it. Here you go with one of the favorite snack of "namma Bengaluru"

Photobucket

You need the following to make Congress Kadalebeeja/Spicy Peanuts:
Peanuts : Few Cups (as much as you want to make)
Oil (you may need maximum of 1 tbsp for 4 cups of peanuts)
Curry leaves : 1-2 strings

For spice mix : Redchilli powder, turmeric, riceflour(tsp) salt and coarsely powdered black pepper powder. Mix everything and keep it ready.

Method :
Microwave peanuts till they are crisp. Remove from the oven and let it cool. Deskin them.
Heat oil in a pan and add deskinned peanuts and fry for 2-3 mins along with curry leaves. When peanuts get crisp in oil. Switch off the stove and add the spice mix and mix thoroughly. Let it come to room temparature.

How to serve/enjoy:
Make a mug of coffee. Wish for little rain (if it is not raining :P) Start munching spicy peanuts and sip coffee in between ....till you figure out which container to refill :-)

Capsicum Yenngai

Capsicum yenngai is a one simple and tasty side dish which i learnt from my mom. This goes well with Rice flour roti(ಅಕ್ಕಿ ರೋಟಿ ), can also be enjoyed with Chapatis and Plain Rice.

Ingredients :


Capsicum - 4-5big Chopped into 2 inch pieces
Onion - 1 big
Coconut Grated - 1/2 cup
Tamarind pulp - 2tbl spn
Jeera - 2 t spn
Roasted channa dal(ಹುರಿಗಡ್ಲೆ)- 2-3 t spn
Niger Seeds(ಹುಚೇಳು)Powder - 1-2 t spn (Click on Niger to see the description)
Curry Powder(ಪಲ್ಯದ ಪುಡಿ) or Sambar Powder- 2 t spn
Oil - 1tbl spn
Jaggery - 1 t spn
Salt - As per taste
Coriander leaves - 1/4 cup chopped

For Seasoning:

Mustard Seeds - 1tspn
Curry Leaves - 1 string
Green Chillies - 5-6 chopped
Garlic - 3-4 cloves chopped


Method:

1)Heat oil in a kadai add mustard seeds allow it to splutter then add curry leaves, green chillies, garlic, Onion and fry till onions are transparent.
2)Add capsicum and fry in oil for 2-3min, then add 1/2 glass of water and allow capsicum to cook till tender.
3)Dry roast grind jeera and roasted channa dal into fine powder and keep aside.
4)Now add Curry powder(ಪಲ್ಯದ ಪುಡಿ), jeera-channa dal powder, tamarind, coconut, Niger powder(ಹುಚೇಳು), Jaggery, salt mix well and cook for 10min in low flame garnish with coriander leaves.

From: Sowmya Tripurant


Heerekayi Thove/Tovve (Ridge Gourd with Lentils)

Thove/Tovve was often made by mom for chapathi and it served two in one purpose. It not only tasted well with chapathis but also made an apt accompaniment for rice also. Tovve can be made with or without vegetables, however if you have only tomato and onions you still can make yummy tovves. Thovve/Tovve is an ultimate comfort food for most of us. There are different ways of making tovve, and I have listed few Tovve's from other bloggers who are from Karnataka. Here is how I did with Ridge Gourd :

Heerekayi Thove/Ridge Gourd with lentils :

Ridge Gourd : 1 small (washed, peeled and chopped into 2" cubes)
Onions : 1 (deskinned and chopped )
Hesarubele/Moongdal : 1 cup
Turmeric : 1 pinch

Pressure cook all the above(4 whistles in a pressure cooker)
Once the pressure comes down, remove the vessel and mix the contents with the back of a spoon.

To finish off making you need :
Tamarind Juice : 2tbsp
Saarina Pudi : 1/2 tbsp (adjust according to your spice levels)
salt
grated fresh/wet coconut : 1 tbsp
chopped coriander leaves : 1tbsp
Tempering : Oil, mustard, curryleaves and red chillies

Do the tampering in vessel you wish to make tovve. Heat oil and add mustard. Once mustard stops crackling add red chillies and curry leaves. Mix and add tamarind juice, saarina pudi, salt and coconut.
Pour in pressure cooked dal mixture and mix well. If you have a mechanical hand mixer, mix the contents and make it into coarse paste. Heerekayi should still retain its shape wile dal gets mashed.
Brin it to boil and check for correctness. Adjust the flavors, garnish with coriander leaves and serve hot with rice.

I made tovve using tamarind and saarina pudi mainly because my main course was rice, if you want to have it with chapathis, I would prefer making in Ruchi's way .


Photobucket


Few Tovves from fellow K bloggers :

Moongdal Tovve from Ruchi
Hesarubele Tovve from Grihini
HuliTovve from It'slife
Avarekaalu Tovve from It'sLife
Nuggesoppu Tovve from Savi-Ruchi
Thove from Mane Adige
Heerekayi Thovve from Nalapaka

Haagalakayi Palya / ChineseBitter Melon in Tamarind Sauce

Haagalakayi is one of the favorite vegetable of my husband and his family. Chinese Bitter Melon is longer, plump and have less ridges on its surface compared to Indian Bitter Gourd. It is less bitter than the Indian variety.

Photobucket

What you need :
Chinese bitter melon : 1 (washed, de-seeded and chopped into thin slices)
Tamarind juice : 2 -3 tbsp (adjust according to your taste)
Jaggery : 1 small gooseberry size
Palyada Pudi : 1/2 tbsp (scroll down for the recipe)
Turmeric : 1 big pinch
Salt
Oil : 1/2 tbsp
mustard, curry leaves

Method :
Heat oil in a non-stick pan. Add mustard and let it crackle. Time to add curry leaves and turmeric, mix and add bittermelon pieces. Mix it properly and cover the lid. Lower the flame and let the bitter gourd pieces get cooked on a low flame.
After 2-3 mins, open the lid, mix the contents and add half a cup of water, cover the lid and continue to cook till bitter melon pieces become soft. It takes about 10 mins time (more or less than that).
The water must have almost condensed. Add tamarind juice, salt and jaggery and palyada pudi. Mix and bring it to boil. Adjust the flavors and serve with your favorite main course.

Photobucket

Palyada Pudi :
Kadalebele : 1 cup
Uddinabele : 1/2 cup
RedChillies : 15 (add less if you want a less spice version)
Pepper : 10 (add less if you want a less spice version)
Cinnamon stick : 1" piece
Cloves : 5
Curry leaves : 20 leaves (please note it is 20 leaves not 20 lines of leaves)

Roast all of them separately on a hot tava. Powder them and store it in a airtight container.

Some sweet treats with this post :

Ujju of Cuisine Point has given me a personally designed and created award to me. She has honored me with "Most Generous Blogger" award. I am soo very honored Ujju. Thanks a ton.
Ramya of Ramya's Kitchen Corner has awarded me 360 degree foodie  award, Great Buddy award and Kreativ Blogger award. Thank you soo much girl for showering so many awards. You can find the pictures of all awards here 
Good Job award from Andhra Flavors Thank you dear AF for the award. 
I would like to pass on 360 degree foodie  award, Great Buddy award and Kreativ Blogger award, Good Job award to :

Ramya Vijaykumar of Spicerack 
Roopa Sharon of The Key Bunch
Sunshinemom of Tongue Ticklers
SMN of Cook Spot
Ramya of Ramya Cooks
SriPriya of Srikar's Kitchen

Congratulations all ladies, keep blogging ..............   :) :)

Chirumaalu Payasam

Chirumaalu/ Kusuri ( 'chirumaalu'  is a colloquial name) payasa is a tasty treat. Kusuri is made of maida flour and is mostly found in Arya Vysya Weddings. We call Chirumaalu as Kusuri at home. I googled for Chirumaalu and Kusuri and had a good time laughing over the results. Chirumaalu did not yield any results, Kusuri yielded all Japanese references.
Arya Vysya's history trace back to Penugonda, Andhra Pradesh, birth place of godess Vasavi. Their language or terminologies remain in Telugu and its influence lingers despite their settlement in different parts of India. Wedding customs of Vysya's change from place to place, regional influence being one of the possible factor for it. A day before wedding, bride and bridegroom parents exchange snacks, sweets, keepsake decorative items (hand made or store bought), carved dry coconut (beautiful art which requires lots of patience) and many more things during an engagement ceremony.  Few days before marriage we all sit together to make toy bananas, oranges, etc all fruits, all possible vegetables from maida flour. It is sundried and painted. They are packed nicely and arranged in beautiful plates for exchanging ;) The more you have on your side the more you have to show off ;) I will try to source few photos of wedding next time I visit India. Kusuri is a part of such exchange.
I did not know about this payasam untill my sister enlightened me about it. My sister's MIL made Chirumaalu  specially for me. I was so honored when my sister handed over the packet of Chirumaalu to me.
Making Kusuri is an art which only takes your time and tests your interest to do it. Once you taste the payasa made of them you will thank yourself for spending your time on it. Below is the picture of Kusuri.

Photobucket

It is a simple payasam, if you have the above raw material/Kusuri. Here is how you can make it for yourself :

Chirumaalu/Kusuri :
Maida Flour : 2 tbsp
Milk: 2-4 tsp

Mix both to make a stiff dough. You may get a small gooseberry size dough.
Pinch half a mustard size dough and hold between you thumb and forefinger.
Press to make a disc and then roll it to make a cigar.Collect all of them in a plate. Remember to put them apart or else they may stick to each other.
Sundry it till they are crisp.

How to test the crispiness :
If you hold a teaspoon of kusuri in you fist and shake it you should be able to hear clinking sound which indicates crispiness of the product.

Chirumaalu/Kusuri Payasam
Chirumaalu/Kusuri : 1 tbsp (quantity as shown in the picture above)
Thick Milk : 4 cups
You can use evaporated milk, but plain milk is more tastier for some reason.
Sugar : 4tbsp
Ghee and dry fruits

1. Heat one tbsp of ghee in a non stick pan and fry dry fruits. Fry raisins and cashews separately. Raisins plump and cashews brown in while you fry.
2. Drain the dryfruits to a cup.
3. Add Chirumaalu/Kusuri to the same pan and fry it with the left over ghee till Chirumaalu/Kusuri turns reddish brown.
4. Add 4 cups of  milk  and bring it to boil. Let Chirumaalu/Kusuri get cooked in the milk. Chirumaalu/Kusuri get soft when they are cooked (similar to shavige/sevai)
5. Once Chirumaalu/Kusuri is cooked, add sugar and continue to boil till sugar is dissolved well and milk thickens. Switch off the stove. Garnish with fried dry fruits and serve hot. Chilled Payasam also tastes yummy.

Photobucket


This also goes to Aparna of My Diverse Kitchen for her Sweet Celebrations

Ragi Mudde Rotti

Final post (I hope so..) for 'Challenge' event. Have you ever had left over mudde at home? just knead it with extra ragi flour to make a stiff dough and make them into chapathis on a non-stick paper and fry them on a hot girdle. Done!! Mudde Rotti is ready to eat. Caution!! Be gentle to the dough while rolling them. 
Ragi Mudde/ball making procedure can be found here.
If you do not have left over mudde, just add 1 extra cup of flour while making ragi mudde and you end up getting a stiff dough than soft spongy ball. Next procedure is to just knead to remove lumps and roll them on a non-stick paper. Have patience. It may take a while for the rotti to get baked as it is very soft.
Easy right! I had coconut chutney, tomato chutney and bittergourd palya to enjoy my mudde rotti.
Suggestion : Suits best for elderly people who don't have strong teeth and are bored eating Mudde. You can serve it with plain dal/curd too.
Suits best for diabetics. Mudde rotti and bittergourd palya is a good combination.

Photobucket

Apple Pickles from Sowmya  of Cooking Station Blog
 Grilled Red Pepper and Tomato Soup from Cooking Station Blog
Photobucket

Sorghum and Bajra flour rotti   (Procedure is same as mix flour and mix veggie akki rotti)   
       
Goes to Veda of Iyengar's Kitchen for her Challenge event

Eggless Chocolate Cake to Celebrate Shower of Awards

I am not a baker I don't have to write this anymore! yippee..I jumped and danced with joy when my cake turned out perfect! I was suddenly as young as my son in celebrating the joy of near to perfect baking. 2 weeks before I baked Soumya's Eggless Orange Bread and it had turned out good, now that gave me enough strength to try out Eggless Choclate Cake. The recipe was from my dear friend Nupur.Thanks Nupur for a foolproof recipe, Cake was lipsmacking. My dear hubby does not like choclate cake and I was the sole owner for the whole cake. Akash ate a piece of cake and asked me give him a cake with cream topping :( !! he suddenly remembered his BEN10 birthday cake. Never mind la! I can eat more ;) I said to myself and helped generously to the cake.

A ton thanks to hubby who ate experimented cakes which I baked before which were ......don't have to mention yeah..so he has great patience !! :D

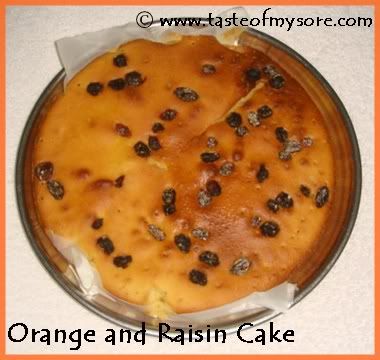
A look at Sowmya's Tried and Tasted Yummy Orange flavored cake

Photobucket

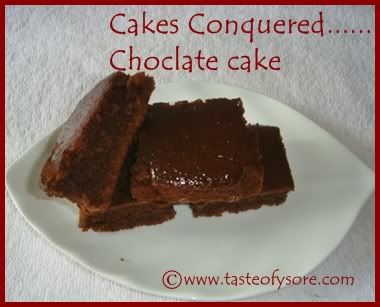
Cake pieces piled up.....
Photobucket

Read the method if you are a dummy like me to baking, or else you can just eye around the ingredients!
Photobucket


Here is the  original recipe from Nupur :

Dry Ingredients:
Wheat Flour : 1cup
Maida : 1 cup
Brown Sugar : 1.5 cups (if you want too sweet, u can use 2 cups)
Cocoa Powder : 3tbsp
Baking Powder : 1.5tsp
Baking Soda : 1/2 tsp

Wet Ingredients:
Semi Sweet Choclate melted : 1/2 cup
Banana : 1/2 (mashed)
Sour Cream : 1/2 cup
Unsalted Butter : 4 tbsp
Vanilla Essence : 1tsp


 tweaked recipe.......
1Cup holds100ml of water.

Dry Ingredients:
Self Raising Flour : 2cups
Brown Sugar : 1.5 Cups (Powdered)
Cocoa Powder : 3tbsp

Baking Powder : 1.5tsp
Baking Soda : 1/2 tsp

Wet Ingredients :
Sunflower Oil : 1/2 cup
Thick Curds/yogurt : 1/2 cup
Vanilla Essence : 1/2 tsp
Milk: 1 cup

Few rules of thumb :
1.Measure ingredients appropriately
2.Beat in one direction
3.Emulsify the liquids properly by beating in one direction

Short cut for emulsification :
I do not have a hand blender which made me think that cake is out of my way as I don't have stamina to beat the liquids till they emulsified.
I used juice blender, 3 whisks and the liquids were emulsified!!yippie...so smart ;) I know I am patting my back :P
Method :

Prep-work :
Grease the cake tin, cut a appropriate size butter paper and line inside. sprinkle dry flour over the butter paper. Keep this ready
Oven Temparature : 170 degree centigrade, for 40 mins. You should pre-heat the oven so set the timer for 10 mins more. Cake batter preparation will take 10-12 mins if you have all the ingredients weighed and ready!

1. Sieve all dry ingredients together.
2.Blend oil and yogurt in a blender I pulsed it 3 times to aid the mixing of liquids. Yogurt and oil does not blend well as milk and oil but don't worry as long as you have blended them mechanically. Add vanilla essence to this mix and transfer all the liquids to a convinient vessel
3.Now add dry ingredients to wet ingredients. Start mixing in one direction only. You need extra liquid to make into a smooth cake batter.
4.Take 1 cup of milk in the same blender in which you blended oil and yogurt. Blend milk, pulse it 3 times.
5.Add milk to the thick cake mix and mix and make the batter smooth. The ready batter is of dosa batter consistency.
6.If you need more milk you can add.Mix the batter in one direction for about 2-4 mins. Do not make the batter runny, it will result in a moist cake. Tastes more like tambittu LOL.....
7. Transfer the batter to greased cake tin and bake it in a pre-heated oven at 170 degree centigrade for 40 mins till the knife inserted comes out clean. You can bake for additional 10-15 mins if required.

The result is............
Photobucket

What you need to keep in mind?
Oven temparatures differ from each other. Get to know your oven. It takes some time.
You may fail at the first time, but you will definetly succeed one day like me. Practise makes man perfect you see :D 

AWARD TIME

Since it is a chocolate cake, let me thank Ramya, Rekha and many more who showered me with this award. Thanks all for your love towards chocolate and me ;)

Lubna of Kitchen Flavours has passed me several awards like "APerfect Blend of Friendship", "Butterfly Award", "I am a Chocoholic", "Good Job" and "Inspiration Award"

Many thanks to Priya of Priya's Easy and Tasty Recipes she has showered me with Hard working blogger award. We all work hard in Kitchen and before computer to make our posts wonderful.

Ujju of Cuisine point has also showered me with Chocoholic award, thanks Ujju and please chocolate cake tagolli :)

Uma of Essence of Andhra has passed me "Great Buddy Award", "A perfect Blend of Friendship", "Hard Working Blogger", and "360 degree blogger award" Thanks a ton Uma. You are a great buddy and we blend perfectly, work hard and do 360 days of blogging :)

Smitha of Kannada Cuisine has fondly sent my way "Great Buddy Award", "A perfect Blend of Friendship",
"Inspiration Award"  and "Kreativ Blogger" award. Dhanyavadagalu Smitha, please neevu ondu piece cake tagollipa.. She has also tagged me for 7 things MEME and here it goes :


Time for MEME
7 Things I Say More Often
1. umm..aamele (as though I am listening to a story)
2. Oddare (when I get irritated..which means "if I kick..")
3. hii..
4. riiii (that's how I call my hubby)
5. ayyo rama ..(an exclamation ? with the name of lord Rama)
6. Akash!!!!!
7. Feel like munching

7 things I did before
1. Experimented in my kitchen
2. Graduated with a degree in Pharmacology
3. Enjoyed with friends in the hostel
4. Had a lovely time with my ex-boyfriend who got promoted and became husband
5. I had lovely time enjoying the childhood of my son
6. Enjoyed Vacations in different parts of India
7. Gave Birth to my son (could not think of anything else! LOL)

7things I do now:
1. Cook well the kitchen, atleast 80% of the time
2. Teach Akash
3. Take a bus to reach office
4. Multitask in office and home
5. Blogging :) yippee..
6. Baking experiments, how can I forget it?
7. Socialising ....

7 things I want to do ( not sure whether I can write 7! let me see)
1. Have a cup of coffee and eat something
2. Eat Idli and sambar for lunch
3. Cook Dinner
4. Teach Akash as he has English test tomorrow
5. Pack my bags for vacation
6. Shopping
7.Blog and read your lovley coments

7 things that attract me about opposite sex
1. Patience
2. Matured Thinking
3. Financial Prudence
4. Sense of Humor
5. Common Sense
6. Communication Skills
7. Decency
8. Cooking Skills
9. ......this list grows :P

7 Favorite Foods (I wish I had endless list)
1. Cake,Cookies
2. Payasa,Holige
3. Anna, saaru, palya and mosaru
4. All street snacks from ambode, vade, bonda, masal puri, paanipuri, Mandakki churumuri, tomato masale, hesarubele masale, ...ohhh..the list grows
5. Chintamani Hurgalu, peanuts
6. Fried Avarekaalu
7. Avalakki
8. Ottu Shavige
9. Oh gosh it is already 9 and I still have many more :P

I would love to pass all the Awards to
Smitha of Kannada Cuisine,
Sushma of SaviRuchi
Vani of Mysorean
Ramya of Ramya's Kitchen Corner
Ramya of Mane Adige
Rekha of Plantain Leaf
Sowmya of Creative Saga
Priti of Indian Khana
Sukanya of Sukanya's Musings
Indrani of Appyayan
Vanisri of Illatharasi
Cham of Spice Club
Uma of Essence of Andhra
Uma of Uma's Soap Box
Pragyan of Sorisha
Priyanka of Asan Khana 
Divya and Chitra Amma of Chitra Amma's Kitchen
Sireesha of Mom's Recipes
Ujju of Cuisine Point
Divya Vikram of Dil Se
Deesha of Vegetable Platter
Veda of Iyengar's Kitchen
Happy Cook of My Kitchen Treasures
Rajeshwari of RAKS Kitchen
Sukanya Ramkumar of Hot N Sweet Bowl
Prajusha of I Cook I Post
RC of Red Chillies
Madhu of Ruchi

will add few more, cannot think now...need a caffiene boost now :) Enjoy your awards!

Chutneys- Carrot, Beet and Brinjal

Three colorful chutneys for your all. Carrot, Beet and Brinjal. Carrot Chutney is a learning outcome of blogging while two others were regularly made by my mom.

Carrot Chutney

You need :
Carrot : 1 big or 4 little ones (Indian) or 7 lilliput carrots
Peanuts : 2 tbsp
RedChillies : 4 (adjust accordingly)
Salt
Tamarind : 1" piece
Coriander : 2 strands

1. Chop carrots and cook it with enough water. Scoop carrots and take it in the blender. Reserve the water
2. Roast peanuts and red chillies
3. Take rest of the ingredients in blender and blend it to smooth paste along with carrots
4. If you want more water add reserved water and blend.
5. Scoop the chutney to a bowl and season with oil, mustard, redchillies and curry leaves.
6. Serve with your favorite main course.

Photobucket


Photobucket

Beetroot Chutney is joining Sunshinemom's Purple Color in Food


Salads for 'Challenge' /Cucumber and Tomato Salad

This particular Cucumber salad was my taatha's (grandfather) favorite. He had difficulty in chewing so mother made them with cucumber tirulu (center part of cucumber which has seeds ) and he devored it. At the age of 75 he loved raagi mudde rotti (coming up soon), cucumber salad and tomato salad. Old age and Childhood have such a big gap but behaviour of humans in those two stages are very similar. If childhood has innocence, old age has tiredness :( . It was a challenge to my mother to feed to my taatha, mainly because he was diabetic and he craved for things he was restricted from eating and added to the complication taatha did not have many teeth left :( :( . He often wanted spicy things to rejuvinate his taste buds, and sometimes very plain stuff...and mudde rotti and salad gave him satisfaction for his cravings. Salt biscuits were his favorite tea time snack.. Ajja (grandfather) we miss you!

I remember very few dishes which she made for him and they fit the Challenge event hosted by Veda so much, I thought of posting them here ...

Southekayi Khara / Cucumber Salad
This salad is made often at home and it is tangy, spicy and a perfect salad for me :) You can make them with available ingredients at home in about less than 10 mins (if u are fast enough in cutting and assembling things)

You need the following : (which feeds 4 people)

Cucumber : 2 big (peeled, washed and cut into 1" cubes)
Green Chilli Paste : 1tbsp (adjust according to the spice levels)
Lemon Juice : from 1 medium size lemon (save the rind, you can use it as a brush to chilli paste for tomato salad)
Salt
Coriander leaves : 1tbsp (Chopped)

Mix and toss all ingredients together and taste the salad, adjust the spice levels and serve immediately.

You can see spicy cucumber juice at the bottom of the salad. Drink it and tell how you felt :-)

Another version of Southekayi Khara and Tomato Masala can be found here and here


Photobucket


Tomato Salad 

You need the following :
Tomato : 1 big
Green Chilli Paste : 1/2 tsp
salt
Khara Mandakki (see the recipe here )

Cut tomato slices and arrange them on a plate. Brush chilli paste on tomato. Sprinkle little salt. Top with khara mandakki and serve. Soft Tomatoes and crunchy puffed rice compliment well :) and they are super healthy too..


Photobucket

Khara Mandakki (crispy puffed rice) without peanuts

Khara mandakki I posted before had peanuts and they did not qualify for Challenge. So, this time around I made mandakki without peanuts just for the event. The recipe link is here just delete peanuts and roasted gram from the recipe. You can use dry red chillies instead of green chillies.

Photobucket

Khara Aloogadde (Spicy Potatoes)
You can see the recipe here

Photobucket 


They all are joining Veda's Challenge event at Iyengar's Kitchen